This past weekend I decided to take a break and not go out on Friday night but instead sit down and really focus on putting out some quality images that I have taken since I got here. I chose this family's photos because I had promised to email them the copies later.
 |
| http://www.flickr.com/photos/laughingshutter/6245588033/ |
However, before Friday I've had very little success with photo editing tools and if I edited my photos at all it'd just be to adjust contrast, highlights, or shadows. This night finally gave me a breakthrough as I experimented with the heal, clone, and gradient tools.

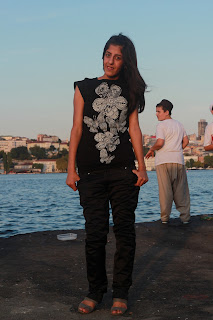
The first picture I worked on was of the girl.
As you can see this was a quickly set up shot. We wanted a water background but if I took a photo from any other direction we'd have A LOT of fisherman. This was the one where she had the best pose and a nice angle. There was no way I could feel happy with having the distraction of the boy in the background or the little plastic tupperware as it'd take away from the girl.
So I cropped the boy out as much as I could but I was still left with his hand hanging precariously on her left.
Using the clone tool I cloned some similar looking buildings and foliage to cover it up. It worked like magic.
For the plastic dish I used a mix of clone and heal until the ground around her looked natural.
I then worked on the highlights and contrast to really make her *pop* as I wasn't using a flash. I think it came out really well.
 |
| http://www.flickr.com/photos/laughingshutter/6245577557/ |
 The second photo that took some work was the portrait of the father. Now he was much more enthusiastic about his photo. In fact he ran out and tiptoed across some small rocks to pose on the ones you see here. I think at this moment I was just so excited to be having a local family inviting me to take their portraits that I didn't think about technical things such as...'where the heck did his leg go?' I'll definately keep missing limbs in mind the next time I'm taking portraits.
 Apart from the missing limb which I know takes away from the quality of the photo but I didn't want to do any tight cropping on this one as we had a beautiful backdrop and the man was really pleased with the shots. It was funny how quickly he had these poses ready to go!
The big thing that got me was the CUP ..some litter that was floating in the water. At first I was having trouble with it because I was using the clone tool but then I brought out the heal tool and walla, the cup disappeared and the rock looked natural. After that I just brought out some of the shadows and played with the contrast.
 |
| http://www.flickr.com/photos/laughingshutter/6245570623/ |
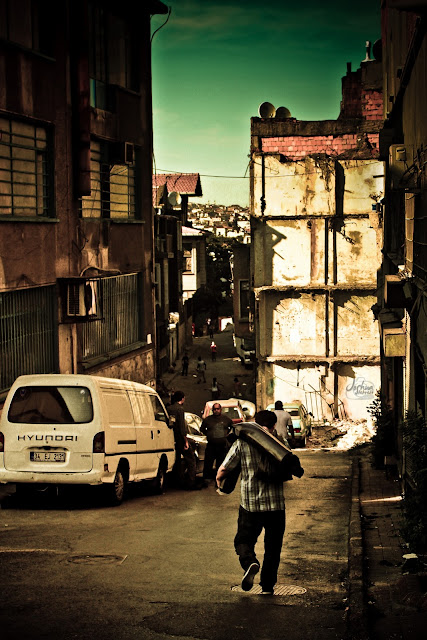
 Last but not least my favorite discovery of the evening was working with the gradient tool on Lightroom 3.
What a gradient tool does is darkens an area of the photo. I know if I was using Photoshop I could also have used the burn tool and perhaps there is one on Lightroom as well that I don't know about. Anyways, I had this photo that had great competition in my opinion but the sun blew out the exposure on the white building and my camera settings were on landscape which really blew out all of the blues in the scenery. So first thing first I worked on toning down the blues. I played around with some black and white presets but decided I wanted to have this in a bit of color. However as I was playing with the presets I discovered all of the rich texture that was hidden on the wall of the white building. Rather than having an overexposed right side I decided to have a go at using the gradient tool. The tool worked like a charm and brought out all of the rich texture in that building. I finished my editing up by bringing out the red in the bricks as I really liked that touch.
 |
| http://www.flickr.com/photos/laughingshutter/6244845707/ |
What are some helpful photo editing tricks you have learned?
Stay tuned for the Lovely Xingxing Photoshoot!
No comments:
Post a Comment